Thursday, October 4, 2012

DIY Unique Apothecary Jars


I love apothecary jars for their many uses- you can always find something to put in one of these great glass jars.  So here is a great way to make it unique and it’s very simple!
Items Needed:
  • Plain glass apothecary jar
  • Frosted Spray paint
  • Sticker letters- found at craft store
  • Painters tape
  • Paper- used to shield spray paint
This is one of the jars I started with:
and here are the stickers I used- doesn’t matter what color because you just use them as a stencil
I’m not usually a big fan of Valspar wall paint, but their spray paint is pretty good:
Step 1: place stickers in desired position on the jar:
Step 2: Place tape in a straight line above letters and attach to paper- ultimately you are creating a rectangle around the letters
Step 3: Once dry (very important:), you can remove the tape and the letters
Final Result:
Yes, I had one that said “Salts”, but I am so impatient that I removed the letters too early and ruined it:( Anyway, such a cute easy DIY that I had to share. Hope you all enjoyed!
[top]

Sunday, September 2, 2012

DIY Picture Frame Tray


Everyone loves serving trays- they are extremely versatile and who doesn’t love an accessory that you can use in several different ways!  Here is a quick way to transform a picture frame into a tray.  Mine is a bit eclectic because I used leftover things I had lying around the house.

Items Needed:
Picture Frame (make sure it’s a wood frame)
Drawer Pulls
Fabric of choice
Scissors
Screwdriver and drill
Here is what I started with for an old frame (amazing what I can find in the garage!)
I removed back and put it on my fabric to use as template:
I then placed in frame with fabric down to glass:
I quickly realized I could not use the screws that the cabinet hardware came with and I would need to pre-drill holes. I had a few leftover pulls from a client project so mine are mismatched, but it gives it that eclectic feel which I love!
and here is the final product- so easy to do- it took me all of 10 minutes to complete this project:
Here it is in my bathroom … every girl needs a place to put her wine:)

Friday, August 10, 2012

All About Teal

Right now I am loving anything teal- it’s my color of the month!  Here are a few of my favorite teal items I’ve run across recently


This teal moraccan tile is fabulous- I want this in my bathroom whenever I get around to remodeling it:)


This teal vase is actually a recent purchase for my home. I found the hydrangeas on clearance at Marshalls- they look great in my new vase!


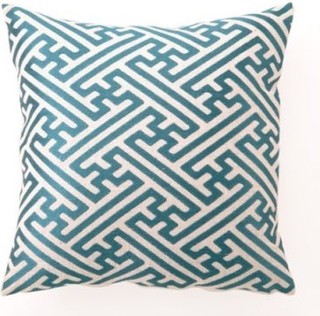
Love this Greek Key Pillow

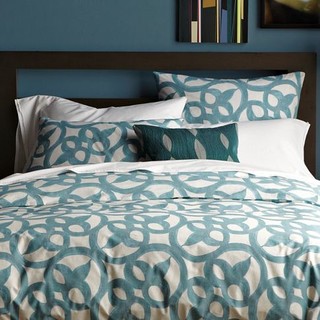
oooh, this West Elm Duvet is so pretty…

Stay tuned for pictures of a great outdoor space I’ve been working on- comfy, eclectic, rustic and of course teal accents:)

Friday, July 27, 2012

Want or Need? New Dining Chairs


So the dilemma is that I want new chairs for my eat-in kitchen table, but do I really need them?  Of course I do!  The ones that I made over from the restore, quite frankly just aren’t that comfortable.  It was cute for a little while, but now I covet the dining chairs I’ve been wanting for quite some time- wicker chairs.  I know, so not practical with a 2 year old who will be sure to get food stuck in them, but the designer in me says, “gotta have ‘em”!
So I found these great ones at Williams Sonoma- for those of you that know me, you know I would never spend $350 on 1 chair- who are they kidding?:)
Williams Sonoma Farallon Chair $350

I also found these gorgeous babies, but again a little too pricey when I need to buy 4 of them.
Ballard Designs Malvern Dining Chair - on sale for $255

So the hunt continued until I found these at non other than… Ikea.  Now I haven’t seem them in person, but they look pretty darn good to me and for only $80 a chair, I may be able to swing it.  Of course, I’ll need to add a cute little lumbar pillow – yes just one more thing for the kids to spill stuff on:)
Ikea Majby armchair $79.99

Now all I have to do is make the purchase and hope hubby doesn’t notice them:)
So here’s an update- of course when I went to get the Ikea chairs, they were out of stock:(  So I decided to move the chairs from my dining room to see what they look like and surprisingly, I really like them.  So now that they stay, I need new dining chairs:)  Look out Craigslist!
Cottage Breakfast


Thursday, July 19, 2012

The Tea Party Tradition


You know how it is when someone asks you “Where are you from?”, well I couldn’t be prouder to say, “Vermont”.  It was such a beautiful place to be raised. Growing up I often took it for granted and didn’t realize what a wonderful place it was until I moved away and came back for visits.  Our summers were spent in this cottage on Lake Champlain and this is the most special place in the world to me.  I am so glad that I can share what is dear to my heart with my children.  My Mom has always made it a special place to visit.  The week of July 4th is hopping with activities for the kids and the fun never stops.  One of the traditions that my Mom created is the infamous Tea Party- she has been doing it for the grand children for about 15 years.
Our Summer Cottage
As always my Mom’s gardens looked gorgeous the day of the tea party.  Not sure why I never got blessed with a green thumb l-  I can’t even keep a cactus alive:)
The day before the tea party is Dress Rehearsal Day-  most of them were my old prom and bridesmaids dresses that my mom altered to fit little girls! This hat was adorable on Piper, but I knew she’d never keep it on…

The dress my older daughter is wearing was a dress I wore in a pageant when I was about 15 years old.  Yes, I know it was hideous, but back then it made me feel like a princess!
I was so glad my Grandmother who by the way is 93 years old was able to attend- doesn’t she look great?!!!  Piper on the other hand was over the picture taking and the plastic clip-on earrings probably didn’t help:)

Who’s ready for some tea?
Flip Flop Cake Theme This Year
And when it’s over- Bubble Time!…
and this is where my Mom takes her afternoon nap when the Tea Party is all done…
Heaven
The tea party was on our 2nd day of vacation so every morning after that, my little one would wake up and say, “Tea Party Today” (so cute)
I hope I, or should I say my Mom has inspired some people to get creative and throw a tea party for your little girls or grand children. They’re only young once!

Wednesday, July 18, 2012

Exciting News to Share…


Simplicity Interiors has some exciting news to share…  Two of my projects have recently been picked up to be featured in two different national magazines!  I can’t spill the beans on which projects or which magazines until they actually go to print, but I wanted to share my success with all of you!  

Sunday, June 17, 2012

DIY Striped Pendant Shades


My kitchen has been through many phases to say the least.  In the past four years, the walls have been painted 3 times, the tile came up (due to my husbands hard work) and we laid hardwoods (with the help of Bob, our handyman neighbor!) I also painted the stained cabinets a warm white and we replaced the recessed lighting over the island with instant pendant lights.  I love the drum style shade, but just a little boring for me…

With a little help from paint- I transformed them…

New Striped Pendant Shades!

It was very easy to do and can be done on most shades that you feel are a little drab.  Here’s what you need:

  • Lampshade
  • Paint (I used acrylic from craft store)
  • Painters tape (I’m a fan of Frog Tape)
  • Paint Brush
  • Ruler or measuring tape and pencil

I chose a medium brown paint and I took into consideration that when the lights are on, the binding that is currently on the shade looks darker, so I chose to start with painting the binding dark brown and measured 1″ from there.

After taping is complete, paint away.   I applied it pretty heavy after I realized the fabric from the shade was soaking it up and once you hung it back up you could see little white places where the paint didn’t take (I still have a few touchups to do).

Now here’s where I’m supposed to tell you to let it completely dry before pulling off tape, but most of you know I am very impatient.  I decided to pull off tape so I could admire them while they dried!  and voila…

Even though my kitchen has come a long way, I still need to do a backsplash (if I could just decide!), butcher block countertop on island, a few glass front cabinets, new counter stools and It’ll be good to go!

Here is what my kitchen used to look like
Kitchen Before- this is what it looked like when we bought the house 4 years ago
and today…


 and now we’re off to the pool!!!

My baby girl- AKA "Toadey"

Saturday, June 2, 2012

Deck Makeover


I consider myself an outdoors person – I grew up in Vermont, so it’s inevitable!  So tackling the deck for me was top priority this year. As you can see from the before picture, it had not been re-stained in numerous years.  We used to have the traditional table,chair,umbrella set, that quite frankly, we never used.  Overall, our deck wasn’t inviting and I wanted to create a space that was an extension of our home.

This is the Before Deck

I knew I didn’t want to do all one color.  I wanted it to be brighter so I chose a solid outdoor white stain for the rails and a darker semitransparent stain for the floor.  Those of you that know me, know that I love love love to paint, but I can honestly say, this was the most dreadful job ever.  I also chose 2 days to do it when it was in the 90′s- ugh.  I still have a few things to finish up on the other side (you can’t see:).  Anyway, the final result…

I’m pretty pleased with the result.  We purchased some new furniture with comfy cushions and a new rug and now we have a deck we enjoy.  I still need a few more flowers out here, but overall, I think a good start!

Saturday, May 5, 2012

Quick and Easy Update for Lampshade


Everyone is always asking me “when do you find the time to do all these projects?”  Well, the answer is… when my daughter takes a nap.  Most people sit down and relax during this time, but for me, I kick it into high gear and tackle whatever project I feel I can accomplish in a short amount of time – sometimes it’s putting another coat of paint on something (walls, furniture, etc), but today it was giving a lampshade an update.  Here are quick and easy steps to easily transform a lampshade from blah to oooohhh!

This is my old lampshade that I desperately wanted to transform to have a hint of navy

 These are the tools needed- gotta love that it’s a very short list: lampshade, glue gun, grosgrain ribbon, and scissors

First I measured out the ribbon to the length around top edge of lampshade and bottom edge because I wanted to add ribbon in both places.  Luckily my shade already had a binding around it so I could lay mine directly over the existing ribbon. Put hot glue around desired edge- make sure not to get glue too thick or you’ll have thick clumps you can see through ribbon.

Lay the ribbon on glue while still hot, but be careful not to burn fingers

After you’ve gone all around the outside edge you will need to fold over ribbon and glue to inside of shade

Repeat above steps for bottom rim of lampshade and voila you instantly gave it a new look without a lot of work. I love quick and easy DIY projects!

Now the lampshade ties in with the rest of my room!

(knock knock knock- guess who’s up from her nap?  perfect timing!)

Sunday, April 22, 2012

Loving All Things Navy


So here it goes, my first real blog!  Every once in a while I work on a project for a client and become obsessed with a color, pattern, theme, etc. At the present moment, the color I heart is Navy.  I never really considered myself a navy girl, but for whatever reason it has creeped up into the decor of my own home.  I want to share with you a few navy things that have recently caught my eye.
Mary McDonald Concentric Diamond table lamp – the geometric pattern would make a great statement piece in a room.  This is available from www.shadesoflight.com


  Who doesn’t love chevron?!  This fabulous pillow is from Laylagrace.com


What a great table- it doubles as a tray.  Jonathan Adler table available at HSN.com


Sockerart vase from Ikea $12.99


I love the nautical feel of these pillows- navy/white chain pillows available on Etsy.com


  and lastly, the classic wide striped rug- versatile for indoor/outdoor use.  Available atLaylagrace.com


There you have it, a few of my favorite navy finds.  Stay tuned in the coming months for a preview of a Vermont cottage I’m working on…you guessed it, the theme is Navy!